 Back
Back
2012 Kawasaki Teryx
Mod: Warn Winch and Wireless Remote Installation


This mod shows the installation of a Warn winch and wireless remote onto a 2012 Kawasaki Teryx 2012 LE SGE. Not a difficult task but figuring out HOW to perform the wiring itself was very time consuming, especially if you have never done it before as was my situation. The whole process took me several hours.
I'd like to give credit to this winch install thread by Polaris425 on TeryxForums.net which helped a lot, especially in deciding where to mount the contactor and the idea of swapping the long pair and short pair of contactor cables due to moving the contactor farther away from the battery. More on this later.
Warning: If you look at his pictures and compare them to mine be careful because his is a MotoAlliance Viper install and it apparently has a different contactor and different connections for the wire colors than my Warn install here!
Products being installed:
Note: The first 2 items were specially bundled so I could get the Wireless remote and it may be that normally the 3500-S winch comes with a removable wired remote with a connector that you mount and then plug in the wired remote when needed.
When I purchased it the Warn XT line was being phased out in favor of the ProVantage line, and in my case the 3500-S was an "early product package" so I did not get this wired remote (and didn't want it). So be sure you know what you are ordering as my bundled items here may be different!
I purchased these 3 items from Matthew at ATVOutfitters.net who bundled them for a great price. I highly recommend them, both for pricing and great product knowledge and advice. They rock!
Interesting Specs for the 3500-S:
- It is rated 3500 lbs pull when the line is on the 1st layer on the spool, it goes down to 1535 on the 4th layer. Also the motor current increases as the line pull load increases, from 22 amps at 0 lbs line pull, 52 A at 500 lbs, 79 A at 1000, 138 A at 2000, up to a max of 220 A at 3500 lbs.
- However the more the motor heats up the longer you have to wait to let it cool down. Warn says at 0 lbs load and a run time of 2.5 minutes the cool time is 12 minutes. And these following examples each require 10 minutes of cool down: after 500 lbs for 2.0 minutes, 1500 lbs for 1.0 minutes, up to a max of 3500 lbs for 15 seconds!
- Warn recommends a 12 Ah battery minimum, the Kawi manual says the stock battery is 14 Ah.
Decide where to mount the Contactor:
Your first choice now is where to mount the contactor. The contactor goes in the path between the winch and the battery and acts like a relay to switch the high current.
For myself I did not want to clutter up the battery box area in order to leave it free for access to storage of things like a tow rope, first aid kit, tire patch kit, etc. I also wanted to make it easier to mount and access the contactor connections, and there is just a LOT more room under the hood. So I decided to mount it right on the firewall under the hood.
Also, I do not ride in muddy areas but more rocky mountains and dry desert, so wasn't concerned about water and mud from the front tires being an issue. It is mounted in the center away from the tires anyhow.
The key is that they provide a short pair and a long pair of fat cables and unless you want to make new ones you have to check to see that they will reach for wherever you decide to install the contactor.
The directions have you mount the contactor tucked in by the battery attached with short cables and then run long cables to the front to the winch.
But since I decided to mount it on the firewall it is now closer to the winch so you use the short cables to the winch and run the long cables to the battery.
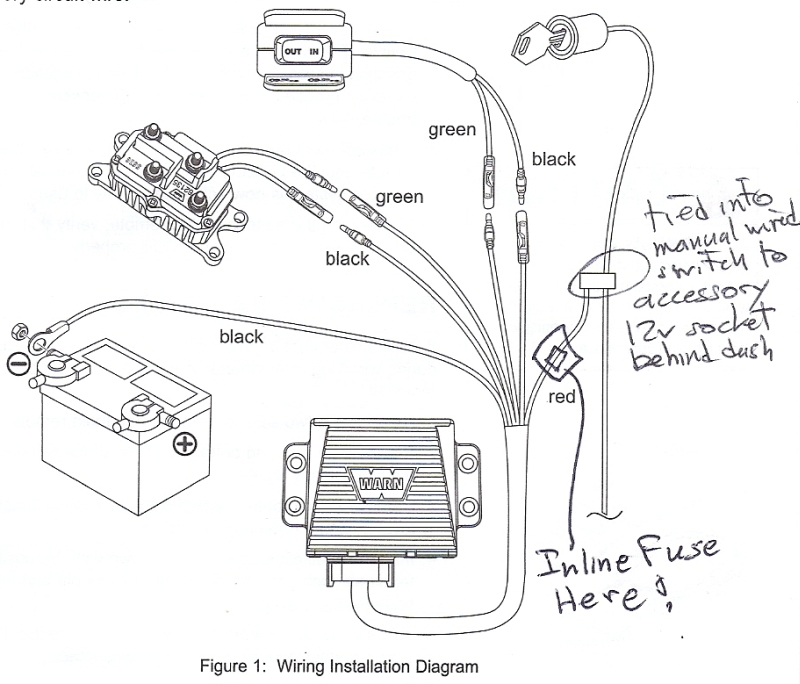
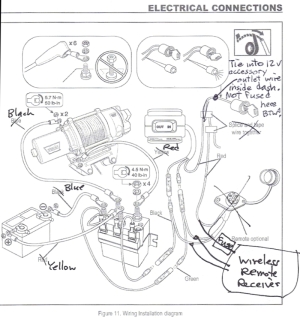
Wiring Diagrams:
I scanned in a couple of key diagrams with notes, which shows some of the key changes to directions that I did, mainly swapping the pairs of cables and their new colors.
Since I mounted the contactor on the firewall under the hood, the Warn cable pairs are swapped. In these diagrams you will see that NOW you use the shorter Red (+) and Black (-) wires to the winch, and the longer Yellow (+) and Blue (-) wires to the battery terminals.
Shown here are thumbnails so click on one to see the full size diagram:
| Overall: |
 |
|
Remote: |
 |
Installation Steps:
First take off the hood and the extra hood panel covering the firewall for access, as shown below. This pic shows the stock area where the winch will go but of course you will need to also remove the plastic bumper shroud and the metal bumper itself as well:

Now run the cables to the contactor mounting area on the firewall. Run the longer Yellow and Blue cables to the battery area and the shorter Red and Black cables to the winch mounting area:


Locate the area on the firewall to drill holes and install the contactor. You will have access to the back side of the firewall to tighten the contactor mounting bolts.
Go ahead and attach the 4 fat power cables to the contactor on the correct terminals, don't forget to slide on the protective rubber boots first. We'll attach the winch and battery ends last. (The last pic shows the 3 little side wires already connected but that occurs in the next step actually).


Now pick a place to mount the Receiver box for Wireless Remote system. I chose to mount it in the firewall enclosure behind the dash using zip ties (1st pic below). It is a bit inaccessible but away from water and I feel that the wireless signal will not be impeded by the body plastic.
For a switched 12v supply I used the wire on the back of the accessory outlet (aka cigarette lighter) wire that is conveniently found in the firewall enclosure as well; just connect the Receiver's red wire that has the inline fuse on it.
I made sure the fuse itself was accessible by poking it through the provided hole in the firewall as in the picture below. Be careful to adjust the rubber ring on the access hole so none of the wires rub against the metal.
Now is the time to also find a place to mount the wired in/out switch (aka "handlebar" switch) that comes with the winch, which also needs to tie into the same 12v source as the wireless Receiver so do them both at once.
I decided to mount it on the tiny shelf on the top of the dash to the left of the steering wheel (3rd pic below). This way I can actually stand outside the Teryx and operate the winch with my right hand and still see the winch. Handy when using snowplow.
Attach the 3 small wires (spade connections) onto the side of the contactor per the instruction manual (and my Overall diagram provided above).


Now finalize the routing of the yellow and blue wires to the battery, and add several tie wraps where they go through the tunnel near the driveshaft from front to the engine area. Be sure to place the cables where they will not rub on the driveshaft or the plastic shroud.
Also be careful where they go around sharp metal corners.
The 2nd pic shows the routing in the front of the battery compartment (looking forward). To be extra safe I used thick plastic "spiral cable wrap" from a computer store to protect it when it is going across sharp metal edges.
The 3rd pic shows the connections to the battery just for reference, but DON'T CONNECT TO THE BATTERY until the final step!


The next step is to assemble the winch itself to the winch mounting plate on the bench. This is not complicated just follow directions for your mounting plate and fully torque the mounting bolts because you will not have access to them after the whole winch assembly is attached to the Teryx.
Ok but here is a very important tricky part. When you attach the winch / winch mount assembly to the Teryx (at least with the MotoAlliance MA11933 mount plate), there will be 4 carriage bolts installed from the top side, with the heads being inside the plate and the bolts hanging down loosely. On my 2012 it is helpful to unbolt the 4 bolts holding the radiator and hoist it up with a strap to give more room to insert the winch assembly.
You will then have to install the assembly and get all 4 of these loose bolts to go through the holes in the Teryx mounting area. This is a little tricky and you can use tape over the heads to hold them in place, however here's some...
IMPORTANT ADVICE !!!
IF you are going to also be installing the MotoAlliance snowplow kit at any time later, doing this now will make your life much easier at that point. The reason is you will have to attach their MA11733 plow mount plate by taking the nuts off of the front 2 carriage bolts and mounting the plow mount from beneath.
The problem is the carriage bolts are too short AND are not captive and will just move up as you try to attach to them, AND this plate blocks you from holding the bolt threads from the bottom side.
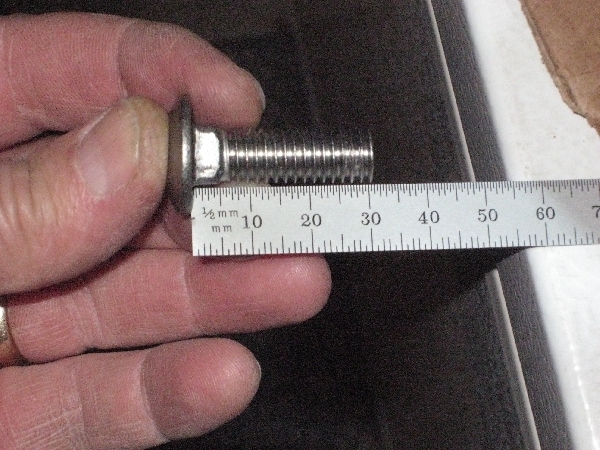
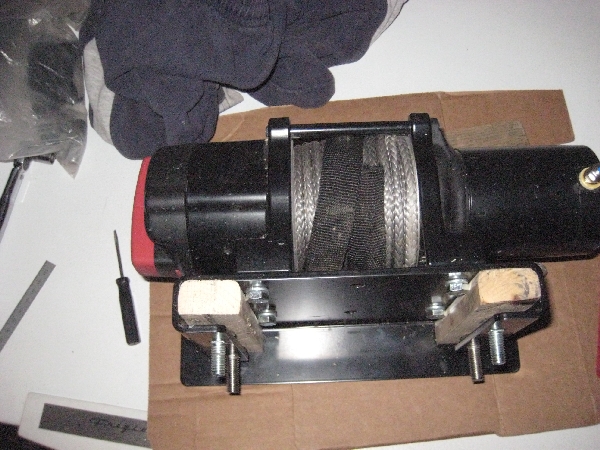
I have explained this fully on my Snowplow Mod page, but the bottom line is for these 2 front carriage bolts, you have to provide longer (30mm) bolts AND a way to hold the topside heads captive. My solution below is to slide a block of wood that is jammed against the top of the bolt heads so firmly they will not be dislodged later.
Here it is in just a couple of pictures.
Now go ahead and mount the winch assembly onto the Teryx winch mounting area with the 4 carriage bolts (modified as described above).
Do not tighted the 4 bolts yet just snug them so it can still move around a little bit. (1st pic below).
Attach the red and black cables (low torque per instructions).
Install the metal bumper assembly onto the Teryx but do not tighten the 4 bolts fully, also just snug them so the bumper can move.
Insert the fairlead bracket assembly between the winch assembly and the bumper using 2 bolts provided. (2nd pic below).
Now TIGHTEN ALL BOLTS! Personally I tighten these in a specific order: First tighten the 2 fairlead bolts fully which needs to pull the winch assembly forward until flush, then tighten the 4 bumper bolts, then finally the 4 winch assembly bottom bolts.


Install the plastic trim over the bumper and the front is done:
Now go the battery box area and attach the battery cables and you are DONE DONE!
Back